![]()
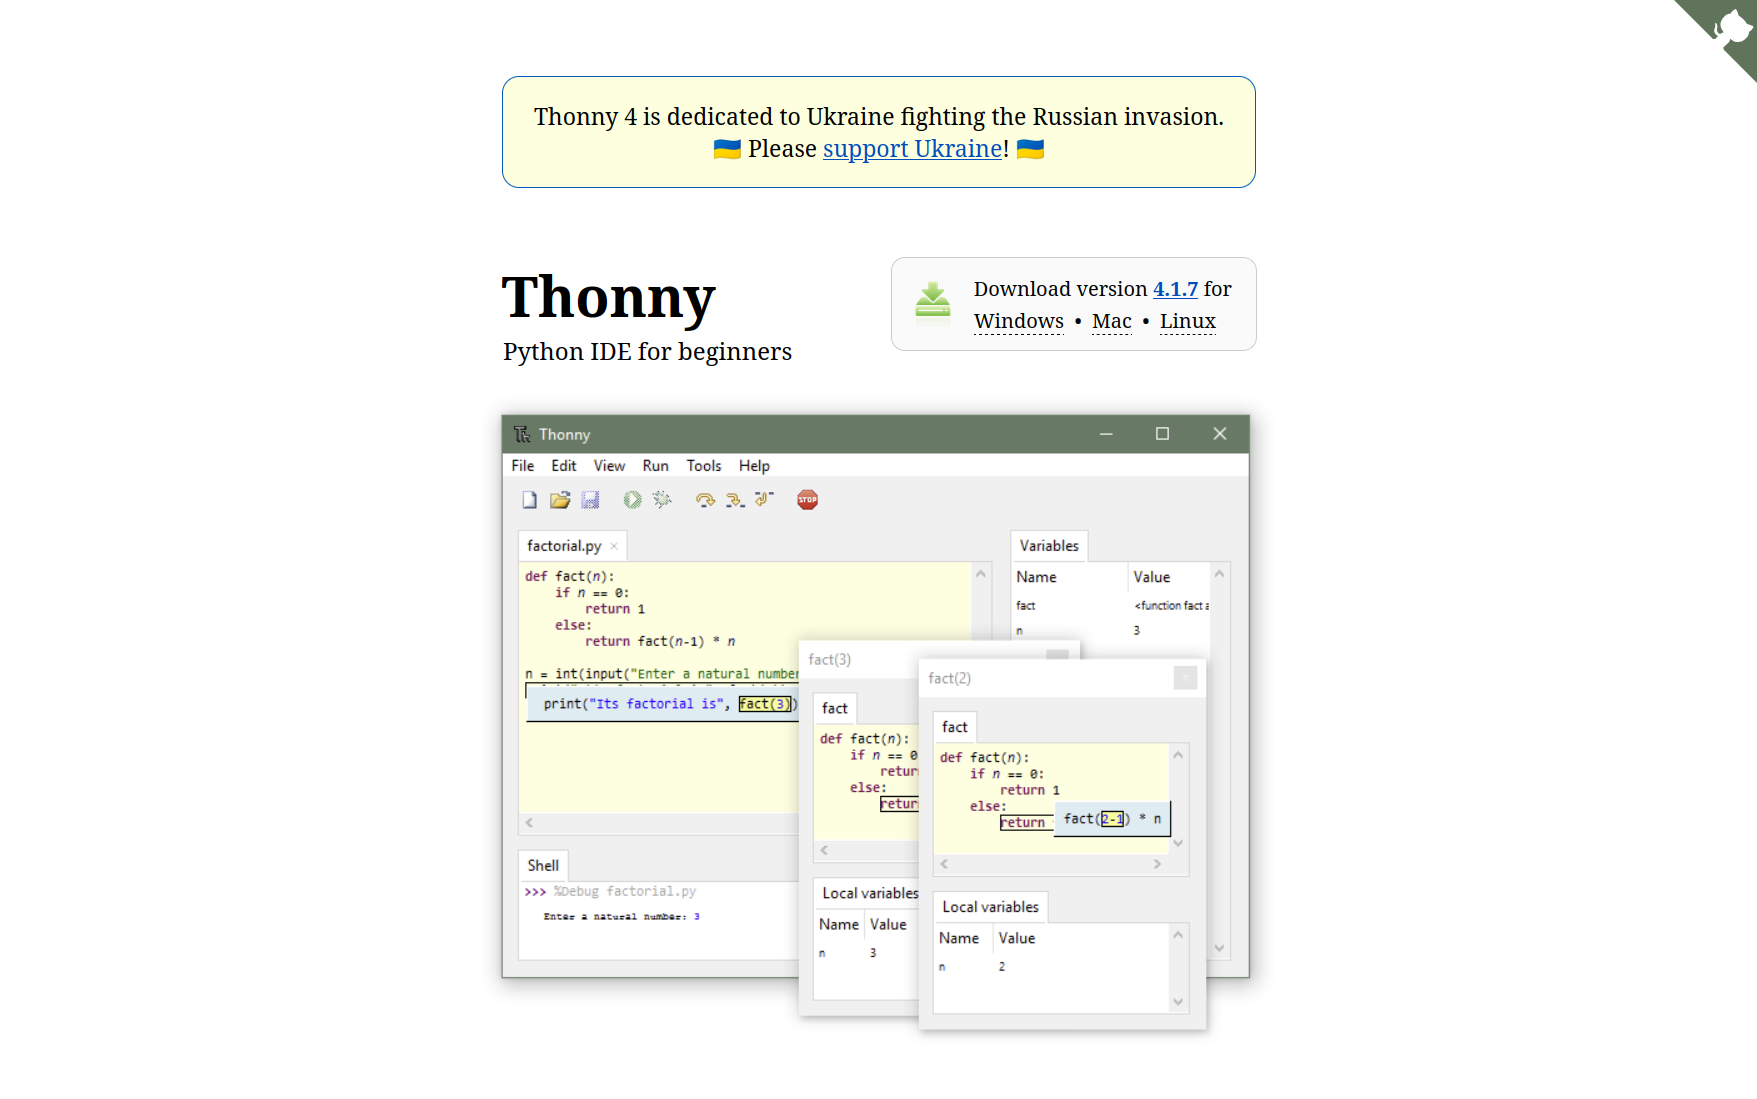
This workshop is aimed at beginners, and it uses the Thonny Python IDE.
from fractpy.models import NewtonFractal
model = NewtonFractal("x**10 - 4x**3 + x**2 - 6")
p = model.plot(-2, 2, -2, 2, (1000, 1000))
p.savefig('fractal.jpg', format='jpeg', dpi=150, bbox_inches='tight')
p.show()import cv2
import sys
def main():
# Load the pre-trained Haar Cascade classifier for face detection
face_cascade = cv2.CascadeClassifier(cv2.data.haarcascades + 'haarcascade_frontalface_default.xml')
# Check if the cascade loaded successfully
if face_cascade.empty():
print("Error: Could not load face cascade classifier")
sys.exit(1)
# Open the default camera (0)
cap = cv2.VideoCapture(0)
# Check if camera opened successfully
if not cap.isOpened():
print("Error: Could not open camera")
sys.exit(1)
print("Press 'q' to quit")
while True:
# Capture frame-by-frame
ret, frame = cap.read()
if not ret:
print("Error: Could not read frame")
break
# Convert to grayscale for face detection
gray = cv2.cvtColor(frame, cv2.COLOR_BGR2GRAY)
# Detect faces in the frame
faces = face_cascade.detectMultiScale(
gray,
scaleFactor=1.1,
minNeighbors=5,
minSize=(30, 30)
)
# Draw rectangles around detected faces
for (x, y, w, h) in faces:
cv2.rectangle(frame, (x, y), (x+w, y+h), (0, 255, 0), 2)
cv2.putText(frame, 'Face', (x, y-10), cv2.FONT_HERSHEY_SIMPLEX, 0.9, (0, 255, 0), 2)
# Display the number of faces detected
cv2.putText(frame, f'Faces: {len(faces)}', (10, 30), cv2.FONT_HERSHEY_SIMPLEX, 1, (255, 0, 0), 2)
# Display the resulting frame
cv2.imshow('Face Detection - Press Q to quit', frame)
# Break the loop when 'q' is pressed
if cv2.waitKey(1) & 0xFF == ord('q'):
break
# Release the camera and close windows
cap.release()
cv2.destroyAllWindows()
if __name__ == "__main__":
main()Welcome to Python programming! This workshop will teach you the fundamentals of Python using the Thonny editor. Python is a powerful yet beginner-friendly programming language used for web development, data analysis, automation, artificial intelligence, and much more.
By the end of this workshop, you'll be able to write simple Python programs, understand basic programming concepts, and have the foundation to continue learning on your own.
Thonny is a beginner-friendly Python editor specifically designed for learning. Unlike complex development environments, Thonny keeps things simple while providing everything you need to write and run Python code.
Step 1: Download Thonny
Step 2: Install Thonny
[Screenshot: Thonny installation wizard]
Step 3: Launch Thonny

When you open Thonny, you'll see:
Let's make sure everything works!
In the editor area (top), type:
print("Hello, Python!")Click the green Run button (or press F5)
You'll be asked to save the file - save it as hello.py
Look at the Shell area - you should see:
Hello, Python!
Congratulations! You've just written and run your first Python program!
To run your code: Press F5 or click the green Run button.
Tips:
calculator.py or shopping_list.pyLet's start with displaying text on the screen:
print("Hello, World!")Run this code. You should see Hello, World! appear in the Shell below.
Try printing your own message:
print("My name is Sam")
print("I am learning Python!")Complete code for this section:
print("Hello, World!")
print("My name is Sam")
print("I am learning Python!")Variables are like labeled boxes that store information:
age = 25This creates a variable called age and stores the number 25 in it.
name = "Alex"This stores text (called a "string") in a variable called name.
Python can do calculations:
result = 10 + 5
print(result)This will display 15.
Try different operations:
addition = 10 + 5
subtraction = 20 - 7
multiplication = 6 * 4
division = 15 / 3
print(addition)
print(subtraction)
print(multiplication)
print(division)name = "Jordan"
age = 30
print("My name is " + name)
print("I am " + str(age) + " years old")Note: We use str() to convert numbers to text so we can combine them.
Complete code for this section:
age = 25
name = "Alex"
result = 10 + 5
print(result)
addition = 10 + 5
subtraction = 20 - 7
multiplication = 6 * 4
division = 15 / 3
print(addition)
print(subtraction)
print(multiplication)
print(division)
name = "Jordan"
age = 30
print("My name is " + name)
print("I am " + str(age) + " years old")You can ask users to type something:
name = input("What is your name? ")
print("Hello, " + name + "!")When you run this, Python will wait for you to type something and press Enter.
age_text = input("How old are you? ")
age = int(age_text)
next_year = age + 1
print("Next year you will be " + str(next_year))We use int() to convert text input into a number we can do math with.
Complete code for this section:
name = input("What is your name? ")
print("Hello, " + name + "!")
age_text = input("How old are you? ")
age = int(age_text)
next_year = age + 1
print("Next year you will be " + str(next_year))Programs can make decisions:
temperature = 25
if temperature > 20:
print("It's warm outside!")Notice the colon : at the end and the indentation (spaces) before print. This is very important in Python!
age = 16
if age >= 18:
print("You are an adult")
else:
print("You are a minor")score = 75
if score >= 90:
print("Grade: A")
elif score >= 80:
print("Grade: B")
elif score >= 70:
print("Grade: C")
else:
print("Grade: F")Complete code for this section:
temperature = 25
if temperature > 20:
print("It's warm outside!")
age = 16
if age >= 18:
print("You are an adult")
else:
print("You are a minor")
score = 75
if score >= 90:
print("Grade: A")
elif score >= 80:
print("Grade: B")
elif score >= 70:
print("Grade: C")
else:
print("Grade: F")Repeats actions while a condition is true:
count = 1
while count <= 5:
print("Count is: " + str(count))
count = count + 1
print("Loop finished!")This prints numbers 1 through 5.
Used to repeat a specific number of times:
for number in range(5):
print("Number: " + str(number))This prints 0, 1, 2, 3, 4 (5 numbers starting from 0).
To start from 1:
for number in range(1, 6):
print("Number: " + str(number))Complete code for this section:
count = 1
while count <= 5:
print("Count is: " + str(count))
count = count + 1
print("Loop finished!")
for number in range(5):
print("Number: " + str(number))
for number in range(1, 6):
print("Number: " + str(number))Lists store multiple items in one variable:
fruits = ["apple", "banana", "orange"]
print(fruits)fruits = ["apple", "banana", "orange"]
print(fruits[0]) # First item: apple
print(fruits[1]) # Second item: banana
print(fruits[2]) # Third item: orangePython counts from 0!
fruits = ["apple", "banana"]
fruits.append("orange")
print(fruits)fruits = ["apple", "banana", "orange"]
for fruit in fruits:
print("I like " + fruit)Complete code for this section:
fruits = ["apple", "banana", "orange"]
print(fruits)
print(fruits[0])
print(fruits[1])
print(fruits[2])
fruits = ["apple", "banana"]
fruits.append("orange")
print(fruits)
fruits = ["apple", "banana", "orange"]
for fruit in fruits:
print("I like " + fruit)Functions are blocks of code you can reuse:
def greet():
print("Hello!")
print("Welcome to Python!")
greet()
greet()This prints the greeting twice.
def greet_person(name):
print("Hello, " + name + "!")
greet_person("Alice")
greet_person("Bob")def add_numbers(a, b):
result = a + b
return result
answer = add_numbers(5, 3)
print("The sum is: " + str(answer))Complete code for this section:
def greet():
print("Hello!")
print("Welcome to Python!")
greet()
greet()
def greet_person(name):
print("Hello, " + name + "!")
greet_person("Alice")
greet_person("Bob")
def add_numbers(a, b):
result = a + b
return result
answer = add_numbers(5, 3)
print("The sum is: " + str(answer))Python has thousands of packages available on PyPI (Python Package Index) that you can install to add extra features. Let's learn how to install a package and use it. On Windows and MacOS this is quite straightforward, however on Linux it is more complex and you might need assistance.
We'll install the emoji package, which lets us easily work with emojis in our code.
Step 1: Open the Package Manager
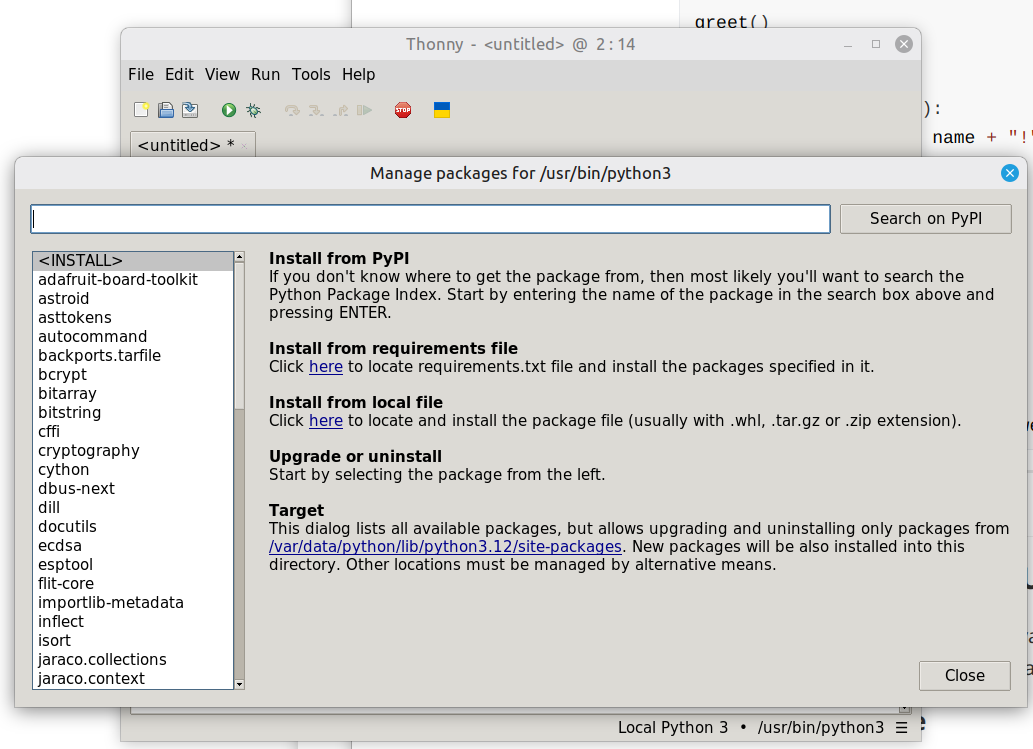
Step 2: Search and Install
emoji
Step 3: Close the Package Manager
Now let's use the emoji package in our code:
import emoji
# Print text with emojis
print(emoji.emojize("Hello! :snake: Welcome to Python! :rocket:"))
print(emoji.emojize("Python is fun! :fire: :star: :thumbs_up:"))
# Get user input and add emojis
name = input("What's your name? ")
print(emoji.emojize("Nice to meet you, " + name + "! :waving_hand:"))[Screenshot: Code running with emoji output displayed]
What's happening:
import emoji loads the emoji package we installedemoji.emojize() converts text like :snake: into actual emoji symbolsTry modifying:
Once you're comfortable, try exploring:
requests - For downloading data from websitespillow - For working with imagesmatplotlib - For creating graphs and chartspygame - For making simple gamesWe will use a basic fractal art generator package to generate fractals with code!
Using the same steps as in Demo 1, install the fractpy package.
The code is available on my website: https://leofebeytech.com.au/services/workshops/
Then click "Beginner Python Workshop"
from fractpy.models import NewtonFractal
model = NewtonFractal("x**10 - 4x**3 + x**2 - 6")
p = model.plot(-2, 2, -2, 2, (1000, 1000))
p.savefig('fractal.jpg', format='jpeg', dpi=150, bbox_inches='tight')
p.show()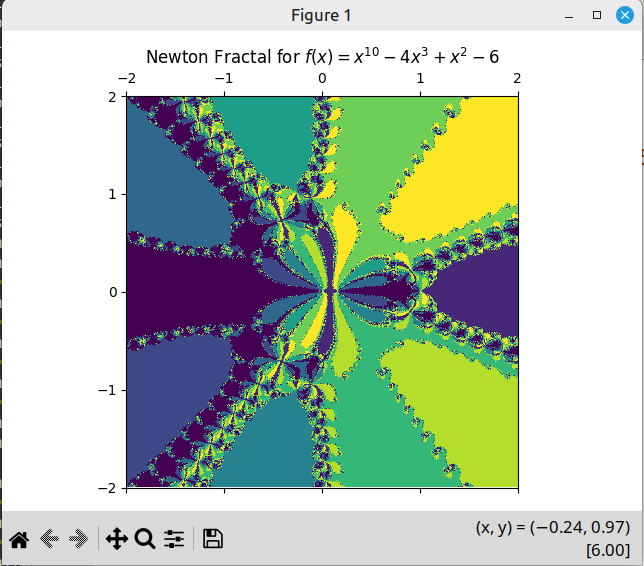
x**8 - 3x**3 + x**2 - 4p = model.zoom_plot()Python can be used to do some very technically impressive things, like any other programming language. OpenCV is a computer vision library which can be used to detect things in images, such as faces, limbs, objects. It uses a variety of algorithms and methods in the background, in many cases very efficiently such that it can run on lower-end devices.
As before, install the opencv-python package. It might take a minute or so to download and install.
This is a lot more code than before, but you can find it on the website as above, to then copy and past into Thonny.
import cv2
import sys

def main():
    # Load the pre-trained Haar Cascade classifier for face detection
    face_cascade = cv2.CascadeClassifier(cv2.data.haarcascades + 'haarcascade_frontalface_default.xml')

    # Check if the cascade loaded successfully
    if face_cascade.empty():
        print("Error: Could not load face cascade classifier")
        sys.exit(1)

    # Open the default camera (0)
    cap = cv2.VideoCapture(0)

    # Check if camera opened successfully
    if not cap.isOpened():
        print("Error: Could not open camera")
        sys.exit(1)

    print("Press 'q' to quit")

    while True:
        # Capture frame-by-frame
        ret, frame = cap.read()

        if not ret:
            print("Error: Could not read frame")
            break

        # Convert to grayscale for face detection
        gray = cv2.cvtColor(frame, cv2.COLOR_BGR2GRAY)

        # Detect faces in the frame
        faces = face_cascade.detectMultiScale(
            gray,
            scaleFactor=1.1,
            minNeighbors=5,
            minSize=(30, 30)
        )

        # Draw rectangles around detected faces
        for (x, y, w, h) in faces:
            cv2.rectangle(frame, (x, y), (x+w, y+h), (0, 255, 0), 2)
            cv2.putText(frame, 'Face', (x, y-10), cv2.FONT_HERSHEY_SIMPLEX, 0.9, (0, 255, 0), 2)

        # Display the number of faces detected
        cv2.putText(frame, f'Faces: {len(faces)}', (10, 30), cv2.FONT_HERSHEY_SIMPLEX, 1, (255, 0, 0), 2)

        # Display the resulting frame
        cv2.imshow('Face Detection - Press Q to quit', frame)

        # Break the loop when 'q' is pressed
        if cv2.waitKey(1) & 0xFF == ord('q'):
            break

    # Release the camera and close windows
    cap.release()
    cv2.destroyAllWindows()

if __name__ == "__main__":
    main()
As you can see, it should detect a face. It will likely be a bit glitchy, and detect many false positives. However it could still be used in practical applications, such as detecting if a person is in a room, or some kind of automatic video streaming script when a person is present.
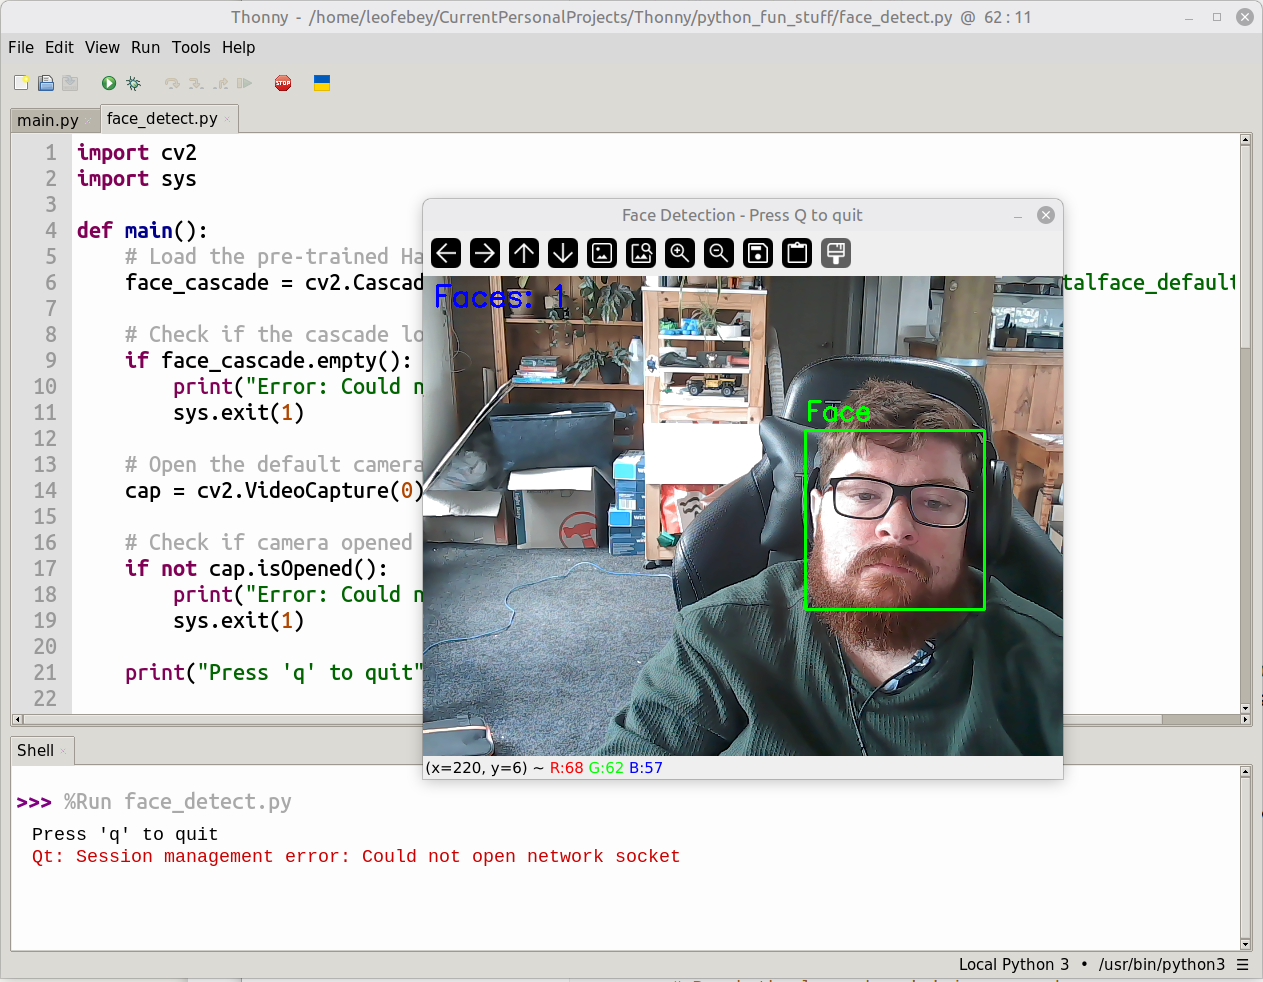
The code uses the Haar Cascade classifier model, which in theory you can modify the training data to detect things other than faces. This is of course very advanced for this workshop.
Create a program that:
Example output:
What is your name? Sarah
What is your favorite color? blue
Hello Sarah! I like blue too!Create a calculator that:
Bonus: Also show subtraction, multiplication, and division.
Create a program that:
Create a program that:
Example:
Enter a number: 5
5
4
3
2
1
Blast off!Create a program that:
Bonus: Print each item with a number (1. Bread, 2. Milk, etc.)
Create a function called calculate_age_in_months that:
Official Python Documentation for Beginners
Thonny Resources
print("text")
print(variable_name)number_variable = 42
text_variable = "Hello"text_input = input("Question? ")
number_input = int(input("Enter a number: "))if condition:
# code here
elif other_condition:
# code here
else:
# code here# While loop
while condition:
# code here
# For loop
for item in range(10):
# code here
# Loop through list
for item in my_list:
# code heremy_list = [item1, item2, item3]
my_list.append(new_item)
my_list[0] # First itemdef function_name(parameter):
# code here
return value+ # Addition
- # Subtraction
* # Multiplication
/ # Division
== # Equal to
!= # Not equal to
> # Greater than
< # Less than
>= # Greater than or equal to
<= # Less than or equal toInteractive Practice
Video Tutorials
Books and Guides
When you get stuck:
print() to check what your variables containOnce you're comfortable with the basics, explore these exciting areas of Python:
Pygame - Create 2D games
pip install pygame (or use Thonny's package manager)Pygame Zero - Even simpler game development for beginners
pip install pgzeroArcade - Modern alternative to Pygame
pip install arcadeKivy - Build mobile apps and touch interfaces
pip install kivyTkinter - Built-in GUI library (comes with Python)
PyQt or PySide - Professional desktop applications
Pandas - Data analysis and manipulation
pip install pandasMatplotlib - Create graphs and charts
pip install matplotlibPlotly - Interactive graphs and dashboards
pip install plotlyNumPy - Mathematical computing
pip install numpyScikit-learn - Beginner-friendly machine learning
pip install scikit-learnTensorFlow - Deep learning framework
pip install tensorflowPyTorch - Another popular deep learning framework
pip install torchOpenCV - Computer vision and image processing
pip install opencv-pythonFlask - Lightweight web framework
pip install flaskDjango - Full-featured web framework
pip install djangoFastAPI - Modern, fast web framework for APIs
pip install fastapiBeautiful Soup - Parse HTML and extract data from websites
pip install beautifulsoup4Selenium - Automate web browsers
pip install seleniumRequests - Simple HTTP requests
pip install requestsPillow (PIL) - Image processing
pip install pillowPyPDF2 - Work with PDF files
pip install pypdf2openpyxl - Read and write Excel files
pip install openpyxlRaspberry Pi Projects - Physical computing
Arduino with Python - Control Arduino boards
Turtle Graphics - Built-in drawing library
PyGame Music/Audio - Sound and music
Discord Bots - Create your own Discord bot
pip install discord.pyTelegram Bots - Automate Telegram
pip install python-telegram-botIf you're interested in...
Games: Start with Pygame Zero → Pygame → Arcade
Mobile Apps: Start with Kivy basics → Build a simple app → Explore advanced features
Data & Analytics: Start with Pandas → Matplotlib → Scikit-learn
AI/ML: Start with NumPy → Pandas → Scikit-learn → TensorFlow/PyTorch
Web Development: Start with Flask → Build a simple site → Django (for larger projects)
Automation: Start with Requests → Beautiful Soup → Selenium
Images/Media: Start with Pillow → OpenCV (for advanced projects)
Happy Coding! 🐍
